Baby Rag Quilt

  There is no bigger or better reward for me than receiving pictures of a new born baby wrapped up in a beautiful baby Rag Quilt that I made. 

 Isn't she precious? Lola's cute as a button too!  :)


My long standing favorite baby quilt is the Rag Quilt.  I've made a ton of these cuties and it never gets old!  Each time a new baby is on the way, I pull some flannel from my stash along with some new and I'm off!  My standard square (block) size is 6".  Having a standard helps because I can take some left over squares from the last three baby girl quilts and add some new and I'm already half way done! (well sort of!)

Cut your unwashed flannel in whatever size you are most comfortable with, just remember you'll be taking a very large seam, I like a 1" seam for these.   This is what's going to give the quilt it's ruffle/lace/rag look we want.  I like to use about 5 different flannels sometimes I'll also throw minki in the mix! It's just so soft and cuddly!


I find the next step very therapeutic: it's sewing criss crosses over each square, keeping the WST and then chain sewing them.   I sew all the squares in one direction, cut them apart, then sew them in the opposite direction and cut them apart.


My Nephew, who's 2 was over one day when I was at this step.  He literally sat on my lap for 3 hours and "helped" me sew the criss crosses over the squares.  He was so intrigued by all of it.  He loved it!   Now every time he comes over he asks if he can sew with me....be still my beating heart!!


The next step is another fun part: laying them out!
I make 7 rows of 7.  I spend a good amount of time auditioning the layout.  I want to make sure the colors are even.  A really great trick is to take a picture of the layout and eye it over.

Once it feels right, I use my Dritz Mark-B-Gone Marking Pen to label the rows. (I've used this pen forever! It's so helpful to have on hand.  Any marks you make during construction lasts - unlike chalk!  Once you're ready for the marks to B-Gone, you just wet it and it disappears!  I label the squares/rows incase I'm interrupted in the middle so I don't need to waste much time figuring out where I left off. 1-7 across the top and A-G top down.


Let's sew!


I take the squares in row two and flip them on top of row one and pin it on the right side.


I then make a short stack working from the bottom row up, making an off set stack.  I chain stitch these together with a 1" seam (leaving them connected) and move right.  I then take row four, and flip the squares on top of three and repeat.

Once that's done, I'll connect three to two, then then five to four, you get it?
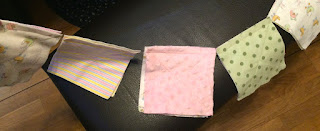


Keeping all them all chained together really helps keep everything straight.


Now you're going to sew the rows together across, folding row 'A' down on top of 'B'.


Remember your 1" seam allowance!  Once it's all sewn together you'll want to sew a 1" seam around the entire perimeter.


When the sewing is done, let the snipping begin!  


Now we make a million little 1/4" cuts or so along the seams.  Trying your best not to cut past the seam stitch.  This might get a little tricky at the begining so just take your time until you get the hang of it.


 I've tried lot of different scissors and the Fiskers 5" Easy Action Scissors work the best for me. You won't believe how tired your hand can get!   Once all the snipping is done, you need to wash the quilt at least 3x to get the full rag look and feel you are going for.

Be aware that anything you put in the wash with the quilt -especially the first few times- will be covered in lent! The washing and drying process will remove all the little threads away to give you this incredibly soft and cuddly little baby blanket.


If you're new to quilting, I'd suggest this be your first!  If you have an interest but haven't tried it yet, this is a great 'dip your toe in' quilt!  The size isn't overwhelming, and your only purchase is flannel and coordinating thread.  No batting is necessary!  And it's all straight sewing!  You can do this!


 You can, of course, make a much larger Rag Quilt to snuggle with as well!
This is always a well received baby gift, no matter how old the baby!  :)


Camping Shower Bag


So my lovely Sister's birthday is now upon us, so guess what?  Yup, another bag! 
One of these days I'm going to jump into a quilt with you I promise I just have to get through a few more gifts first! I'm in birthday overload!

My Sister takes her family and my Mom camping all the time.  Let's be real, it's more like glamping. She has the trailer delivered where she wants it! Ha!  With three kids and my Mom...who can blame her!?  I had the pleasure of joining them this year for a long weekend at Campland on the Bay in San Diego.  Boy, was that nice.  The weather was great.  I stuck my toes in the sand and had great BBQ'ed dinners around a bonfire every night.  Not to mention quality time with the Fam!

So when I thought of a gift for her, I thought why not make her a cute Camping Shower Bag? 
It needed to be big enough to carry all of her necessities - and by necessities I mean everything but the bathroom sink! I don't think she even thinks to pack those small little containers, she's just happy if she remembers to pack all of the kids toothbrushes!  That's a (good) Mom for ya! 

Short on time, I made a make-shift sewing room out of an empty office at work.  (yes, I realize I'm blessed)  Brought the ol' handy travel iron, flip-able cutting/ironing mat and I was in service for a lunchtime sew session! Woohoo!

Since my camping trip with them I've been collecting some camping fabric plotting for the day I'd sit down and make them. I plan to make a coordinating bag for my Mom and cute little niece.   I'll use a little piece of their fabric in her bag. 

Instead of using non-fun muslin on the inside like they suggest, I thought those vintage clocks were way cuter!  Did you notice the s'more fabric?  Sew cute!!
You basically make a casing for a drawstring (that's the pink trailers on top).  

Envelope it, leaving a gap to pull thru. 
Now growing up we always said "envelope it" and that meant to sew it all around, leave a gap and pull it thru so for all of you who are scratching your head...that's what I mean.  :)

So as you know I was "roughing it" at the office...and I couldn't find a bobby pin to pull the drawstring through!  And of course throwing in the towel wasn't an option!  Look at that! A binder clip did the trick! Hooray!


And here we have it!  A cute large, carry all your goodies to the communal shower cuz we're camping bag!
This bag was super easy to sew up.  I think it took about two hours flat. And for those of you paying attention that was two lunch breaks! 
I found the free pattern on the Pellon website.


Sew Together Bag

I picked the wrong month to start making all future gifts handmade.  This month alone we have 5 birthdays...wrong month indeed! 

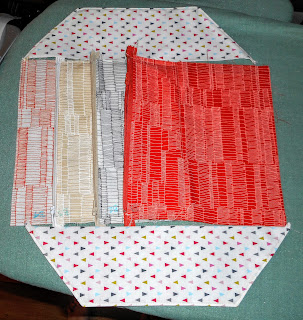
My Sister-in-Laws share the same birthday,  I decided to make them the Sew Together Bag By Sew Demented. 


I used a precut fat quarter bundle along with yardage that would tie all the fabrics together.  I love the fabric! The colorful zippers really make this bag sew much fun!
(I ended up not using that heavy jacket zipper, but maybe next time!)
 
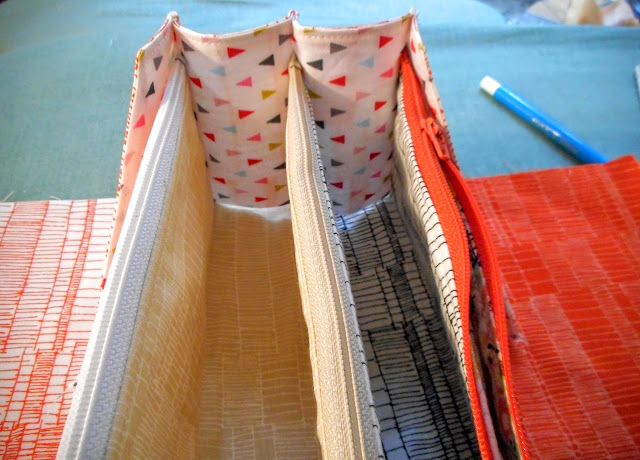
This bag has three zippers on the inside and one on the outside.  In talking to my Mom about the bag, she cringed at the thought of all of those zippers...now I see where I get my zipper phobia from!!! And let me tell you, it really was not that bad! 

I enjoyed making the bag. I had read online that it was a bit of a doozy.  Knowing this, I woke up early Saturday morning to tackle it! 1st and most importantly, read all of the instructions. (and make sure you have everything you need) It took me a few read throughs to really understand her verbiage.   It's an involved pattern and I feel she did a good job explaining each step. 

Steps...there are a lot of steps. This is not a bag that you just whip together. It took a surprising amount of time. I tried to really understand each step so I wouldn't waste  my time having to rip out. :)

Zipper Time!
Sewing in the pockets...
and now we have three!
Bat wings are to close up the sides. I used Interfacing not Batting and I really liked the weight. (if you don't know the difference, please see by previous post)


I enjoyed watching how this came together.
 Next is sewing down the sides, this was a little tricky but you really need to smush everything flat to get the seams to line up. Look at those fun zippers!
 Cameo! Ha! My husband took control of the camera! 
These Clover Binding Clips were very helpful.  You have a lot to hold.
 Almost there and loving what I see!
Not to brag, but I didn't need my ripper until page 11!  Job well done I think! It was the darn tabs! I folded them the wrong way. I hope my pictures help you not too!
And be sure to back stitch the side seams. Flipping them inside out will cause the seam to pull apart if you don't.


 Actually I'm super happy with the way they turned out. All of your seams are covered so it looks very polished. Great gift, if I do say so myself! :)
 Look Ma' no seams!!!


Cute, Cute, CUTE!
By the way, these were a pretty big hit.  Lori already wants three more!  What have I done?


Interfacing, Stabilizer, Fusible Webbing, Quilting Fleece, and Batting - Oh My!


At a glance, it all looks the same and can be pretty confusing. These items are normally placed by the cutting table, probably because everyone has questions about which one to use.

Below are the spec’s for each to help differentiate between them! So next time your pattern calls for Interfacing, you won’t purchase Fusible Webbing like I did!


Interfacing
in(t)ərˌfāsiNG/
noun
1. a moderately stiff material, especially buckram, typically used between two layers of fabric in collars and facings.

It’s job: To provide body and stability. Here’s the biggie…You leave it in! So when you think Interfacing think permanent!

Notes:

  • Fusible or Sewn in. 
  • Applied to the wrong side of the fabric. 
  • Available in different weights and various stiffness. (featherweight comes in a charcoal color, but is normally white) 
  • Sold off the bolt or in packages. 
  • Popular manufacturers: Pellon (bolts are color coded. Pink-Apparel, Yellow- Crafts and Home Décor, Green- Quilting) 
  • Sold at JoAnn Fabric or probably your local Quilt Store. 
Pellon Style # 911FF Fusible Featherweight Interfacing for light to medium weight fabrics


Stabilizer
stābəˌlīzər/
noun

1. a thing used to keep something steady or stable, in particular.
*another term for horizontal stabilizer.

It’s job: Temporarily support for such things as machine embroidery. Here’s the biggie to remember…It’s temporary! Once you use it, you wash it away, tear it away or cut it away.

Notes:

  • Fusible, Sewn in, or already Sticky 
  • Applied to the wrong side of the fabric. 
  • Available in different weights and various stiffness 
  • Sold off the bolt or in packages. 
  • Popular manufacturers: Pellon (bolts are color coded. Yellow-Crafts and Home Décor, Blue-Embroidery) Sullky, Thermo-web, Warm, Clover. 
  • Sold at JoAnn Fabric or probably your local Quilt Store. 


Since I’ve opened Pandora’s Box, let me help clarify some other finds on the same shelf as the Interfacing and Stabilizers…it’s Fusible Webbing, Quilting Fleece, and just so we’re totally in the know, we’ll touch base on Batting too!


Fusible Webbing 

fyo͞ozəbəl/
adjective
1. able to be fused or melted easily.

It’s job: To stick or fuse together. Both sides have heat-activated glue, and for the webbing part, well, just think of it like a spiders web. We use this to stick two pieces of fabric together, helpful when Appliqueing.  Remember the bumpy side will be the fusible side!

Tip: When using, lift and press the iron don’t slide the iron. Sliding can cause unwanted wrinkles! Super important, check for specifications regarding steam or no steam and use an Applique Pressing Sheet. You don’t want to get that sticky residue on your iron plate!
Notes:

  • Available in multi weights 
  • Sold off the bolt or in packages. 
  • Popular manufactures: Stich Witchery, Head n Bold, Wonder Under, Heat n Bond, Therm-o-web, Dritz. 
Pellon Style #725 Heavy Duty Wonder-Under paperback Fusible Webbing

Heat-n-Bond Ultrahold
Protective Ironing Sheet


Quilting Fleece 
fleece
flees/
noun
1. a fabric with a soft, silky pile, used for warmth, as for lining garments.

It’s job: To add thickness and softness. When you want to make a bag that will hold its shape and not feel like cardboard, here’s your option!

Notes:

  • Fusible or Sewn in. 
  • Applied to the wrong side of the fabric. 
  • Denser than Batting, loftier than Interfacing. Available in different weights. 
  • Sold off the bolt or in packages. 
  • Popular manufacturers: Pellon (bolts are color coded. Green- Quilting) June Tailor, Therm-o-web. 
  • Sold at JoAnn Fabric or probably your local Quilt Store. 


Batting 

bat·ting
noun

1. cotton wadding prepared in sheets for use in quilts.

It’s job: To provide a softness that melts into you. We aren’t looking for any stiffness or support - it’s all about the softness and snuggablility!

Notes:

  • Sewn in. 
  • Sewn into the middle of two fabrics. 
  • Less structure than Quilting Fleece. Available in different weights and lofts. (think of loft as the height of which your home baked bread rises. The more loft the more airy) 
  • Sold off the bolt or in packages. 
  • Popular manufacturers: Quilters Dream, Warm Company. 
  • Sold at JoAnn Fabric or probably your local Quilt Store.
Lofty Batting used in our wedding quilt.  It's soooo cozy!


And finally, I know I said that was it but then I found another product that I had never heard of. So we are learning about this one together!


Thermolam Plus
noun

1. It is an extra lofty, needled fleece that will remain lofty after fusing.

It’s job: An extra lofty fleece! It’s a needle-punched fleece with a protective scrim that can provide some warmth. This can be used on fabric, cardboard or wood!

Notes:

  • Fusible or sew-in.
  • Available only in one weight. 45” by the yard width. 100% Polyester.
  • Sold off the bolt.
  • Only manufacturer: Pellon (bolts are color coded. Green- Quilting)
  • Sold at JoAnn Fabric or online. 


Whew! There you have it!

All this chat about the things you can’t even see when you have a finished product. But knowing what to use for each particular sew-able will really make your item shine, like it should!

And please try to support your local Quilt Stores. If we don’t, they won’t stay open. If you have further questions or any quilting questions go to your local quilt store and ask them (or of course you can ask me). That’s why they’re there! They know these products, they’d love to help and they want to hear what you’re working on.


The SewBad "Bonnie" Bag

I have another birthday party to go to and a new pattern to try! We picked up The "Bonnie" Bag pattern by Abbey Lane at Quitcon 2015 in Pasadena.  I think this will be the perfect bag for my longtime bestie.  With the right fabric choices, I really hope you'll be able to get a feel for her fun personality. 


I was able to use focal fabric's from my stash, which I love. Actually the black polka dot with skulls was also a find from Quiltcon. (Cotton + Steel) It's a good one!  I usually package my fabric by project and not by color.  I keep everything tidy and together in Jumbo Hefty storage sliders, basically a giant ziplock bag.  That way when I'm hunting for something, everything is see through and I can normally find what I'm looking for pretty quickly.  It works for me!  


Back to the pattern.  It calls for a canvas lining which will give the bag a nice weight and it's necessary for the magnetic button - otherwise that button would pull right through the fabric.

When gathering, I stop sewing before and after the seams.  I wrap the thread on each side like I'm tying off a boat that might drift out to sea!  I don't want my gathers slippin'.  I think I just do this because that's what I was taught in Jr. High so I'll leave that up to you!


Gather the sides to fit around the base.
You make the inside panel, then the outside, then you marry them together at the end.


Inside view.  Pam loves black, white and red.  The gold is the cherry on top!  The large printed skull and cross bones is a little too flashy for the outside of the bag but makes a fun lining.  Plus, red pockets!  She's going to love it!


This is the outside, same process, gathering the sides to fit around the base.

Flip it right sides out, I kinda love the way that looks!
You can't really tell but some of the dots are silvery, another bonus point for the fun fabric tally!  


For the handles, I deviated a little from the pattern and used just canvas.  (I had it and it worked!)


Be sure to spend the time to line up the stripes. It'll just look nicer.  The devil is in the details!


I married the two together, one inside the other with a 1/2" fold, stuck the handles in and sewed around the rim at 1/8" and 1/4".  I sewed on a red bow for a pop of color on the outside and we are done!


View looking in.
All the different fabric patterns all play nicely together.  It's so her!


I couldn't resist one last little detail...


I love it!


  • Abbey Lane ended up reaching out to us asking for some pictures with me holding it.  :) So we had some fun on a mini photo shoot!  I hope you enjoy them!