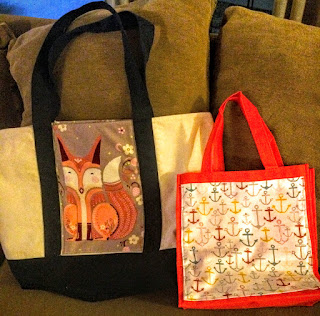
Cutest $1 Tote Bag Ever!

I'm not sure how it is where you live, but in Los Angeles you have to pay for market bags, or any bags for that matter. Let's not even talk about all of the damage the plastic bags are doing to our beautiful Earth.
So take out you're sewing machines!  
We are going to make the cutest $1 Tote bags ever and stop using those plastic bags for good!


You know those dollar bags everyone seems to be selling these days?  I have a bundle of them.
Truth is, I only want to hit the market once a week!  Which means I need about five of these bags to be in the car, ready for deployment for my early morning market day!
The only thing is, as you can see, they aren't very cute.
So, what I've done is made those unattractive but utilitarian bags fun to use!  Who wants to carry around a boring, logo'ed bag when you can alter them slightly and make them super cute!?  I'm telling you, I've got the cutest bags in town!  And it takes no time at all!


Start by picking a bag and take out the hard plastic bottom if it has one. Measure the space you'd like to cover.  I like to do a strip down the middle to cover a logo or just add some pizazz.  Or, you can just do the exact size of a logo you're looking to cover up.  Often, I can just use a large scrap.  While at a quilt show, I like looking for fun and different fabric that would be unusual and unexpected on a bag.  I've found some really great imports from Japan at Quiltcon; bears dancing with umbrellas, deers with red glasses, ohh it's just endless!  Plus I like to make some of the bags a little masculine so my husband can use them as well.

For this example, I'm going to use a panel of Bee Creative fabric by Moda (and again, you can use whatever you have on hand it doesn't need to be a panel as you'll see in some of the finished bags below).
Measure and cut your fabric 1/4" larger than needed on all sides.


Fold back the raw edge 1/4" and press the seam on all the sides.


Lay the panel over the space you're looking to cover.  Sometime you need a little finessing to make it fit in perfect.


Pin real well, and sew slow.  It's super easy to catch other parts of the bag in the seam by accident.  Guess how I know that!...


I like to sew the fabric down super close to the  edge, but again that's up to you. You can also do a fun fancy stitch.


 You too can do this, even over breakfast!


Besides grocery getters, you can make these into your own personalized gift bags.  Let's be honest - those gift bags sold in stores are a small fortune.  Giving a gift in one of these cuties raises the gift giving bar.  Who doesn't love receiving handmade gifts? Even better is these bags can be used and reused for years to come. Think how many plastic bags you'll be saving?  And Mother Earth cheers!

Here's another option, both are equally fun. 


On this grey bag there's a logo on both sides.  
So I'm just going to open up the seam...


 place this adorable Robert Kaufman clothes line pin fabric across the middle...

 and same thing as before measure out the the size strip you'd be happy with.  Fold the raw edge under, once is all it needs.  Give it a quick stitch on both sides, again I prefer getting super close to the edge.  I think it gives it a more profession look.

Once you sew both sides; front and back, tops and bottoms, sew the sides back up.  
Flip it right sides out and you my friend are done! 


How cute are these!? 

I've got the cutest bags in town! 
And sew can you! :)

Sew Many Quilt Books, Sew Little Time!


Have you noticed how many amazing Quilt books are out these days? 

I have too! I could go broke collecting all of them!


I was lucky enough to receive three amazing Books last month for my birthday. My favorite right now is Farm Girl Vintage by Lori Holt of Bee in my Bonnet. I could hardly turn the page I loved every block! I also really love that it's a spiral style notebook. I can totally imagine myself sewing block after block and working through the book till the very last page. When will I ever have the time to do that? I don't know, but I love the thought of it! That's a great goal! Maybe I'll give myself a year. Yikes, I just checked out Lori's Blog and she has an adorable Gobble Gobble Thanksgiving quilt!  Add that to the goal too! 


While on vacation this summer in the small town of Thibodaux, Louisiana, with time on my hands, I discovered libraries have Quilt books! I'm not sure why I'd never thought of this before!  My local library allows you to check out 50 Books at a time. (mind blowing, I know!) This is an excellent way to audition all the different quilt books out there and find the ones that best suit you. It also allows you to check out older quilt books. 

Modern quilts aren't exactly a new style.  Check out 'Gee's Bend' style of quilts for examples. Those date back to the early twenteth century and look very modern. There are a million great stories, blocks and quilts tied up in some of these older books. Check out your local library for the latest and greatest or the gently used prints. I found The Modern Medallion Workbook there. I can't get enough of this book either. I think I've checked it out three times now. :) It's probably next on my must purchase list.   And ebooks don't really work for me.  I want to hold these books.  Just like wine I want to uncork my wine, not a twist top!  Call me old fashion!

The next rainy morning we have, I'm looking forward to curling up with The Farmer's Wife 1930's Sampler Quilts . Not only does it have great blocks, but it has short stories to go with each block! We live in California so I might be waiting a long time, but I can tell fall is coming and I'm loving the cooler weather and football! (it's hard to watch football and quilt - but I'll be working on it!) 

I hope you all can spending time exploring all the great Quilt books that are currently available. Like a favorite cookbook, check out the ingredients, the techniques. Does it resonate with you?

I hope you find some inspiration, new techniques and a little love story that brings you back to the root of it all! 

Keep sewing my friends!

Improv Color Blocks - Baby Quilt

Get ready to become addicted!  My husband had to come pull me away, literally, from making these blocks!  They're so much fun!  I had no idea how liberated I would feel making these blocks.  I enjoyed it so much, I made two quilts!  I didn't even have anyone in mind for the one, but I couldn't stop!

The pattern I used was Improv Color Blocks by Kati Spencer from Modern Quilts from the Blogging Universe.   This is a wonderful Quilt Book, filled to the gills with patters you really want to make! 

Also check out FromTheBlueChair.com.  She's still at it, with great blogs and quilts!

I pulled from my stash, using some fun bright baby prints.  It's mostly Windham Fabrics, from years back with some newly acquired fat quarters. The yardage varied,  you could also use all scraps. 

To start this little addiction, make some random size strips and start sewing them together.  
Remember to use a 1/4" seam.


In some blocks I started the center using a scrap of fabric the size of a dime!  I was creating my own fabric! And loving it! My strips were all mixed up with different sizes and colors. There is no waste of fabric in these blocks.  By the time I made my blocks my scraps could fit into a coffee mug.  It was nice putting every piece to use! If I didn't like how the block angled I'd just chop it off and keep on going.  There's no measuring, no matching up seams, it feels so RIGHT!

I should say, I got a little crazy.  My pieces became much smaller than what the pattern called for, that was just me having fun with it, and so can you!!

This is one of my favorite pictures of my husband and I.  I'm sewing in his music room, working on my Improv Color Blocks and he's behind me playing his guitar.  

That is so us!  :)   Ohh, looking closer I'm in my snow leopard robe...so glamorous!  
Here folks is a picture of me in my PJ's!  Enjoy!  Haha! #reallife.


Back to the blocks! Keep building until the blocks are roughly 10" square.  Then take 2" strips of your background fabric  and frame the blocks. Cut them down to 10 1/2"by 10 10 1/2".
Isn't it amazing how different each block can look?
This was my layout audition picture.  I really think this is a great step.  It allows you to see a different perspective than just staring at it from above. 


Below is the second one I made.  See how the background fabric is different?  And if you look at the two blocks on the right, I really started with itty bitty scraps of fabric.  It was all part of the fun seeing how little of a piece I could use.  In not knowing who these were going to, I wanted to keep them gender neutral.  Even though I used blue as the background fabric, I think a little girl could pull this off.  Maybe it's the shade of blue.  :)


I quilted this myself on a large frame using a  long arm Juki quilting machine TL 2200 QVP.  It was the first time I had ever quilted using this set up.  I can only say, it was like seeing behind the curtain at a magic show!  I was in awe!  :)

I found this fabric so cheerful and happy.  And this pattern matched it!

I really enjoyed making this quilt. I also think this would be a great first quilt due to the limited rules!  

DIY Tote by amykathryn, Thanks Pintrest!

Like many of you, I spend way too many hours on Pinterest! It's time for me to stop just saving to my favorite boards - it's time to put these pins into action!


I needed another bag pattern for my Mom's camping birthday tote bag. (It's my Mom's 49th birthday...again) One that kept catching my attention on Pintrest was the DIY tote by amykathryn


Short on time (as usual) to make this birthday gift, I used my lunch breaks to sew in the office. One day someone is going to be pretty surprised when they open the spare office to find my new sewing room! Won't that be fun for them?! 

Back to the bag! I used my camping stash and went full speed ahead. A note about that...always, always pre-read the instructions before diving into any pattern. It's like cooking. Read the recipe. Make sure everything sounds good. Eye over the ingredients, make sure you have every thing you'll need, then start. Trust me, this will save you time and more importantly FABRIC in the long run! 


I chose a directional print as the outer fabric base for my bag with non directional sleeping bags. 


The inside print is smores with matchstick handles and matching inside bottom. 
Because I chose a directional print, I adjusted the pattern to allow for the two 1/4" seams needed to change the direction on the backside of the purse. (let me know if that doesn't make sense) 


The bag came together pretty darn quick. I used some stabilizer just so the bag would have a little more body. I also doubled the handles (cutting 4 instead of 2), sewing down the sides and flipping them right side out. The pattern really never discussed how to....handle them so I did them my way! :) 


This is a three hour straight forward small tote. The fabric was super cute if I do say so myself! 
 My Mom seemed to really like it. 

Happy Birthday Mom!


Tanner, well he just couldn't help himself.  He went right into his Nana's new camping tote and into a huge bag of jumbo marshmallows!  Who can really blame him?  

What's camping without the smores?  
Who an I kidding?!  Who cares if we are camping or not, let's just eat some marshmallows!