Succulent Garden, my way!


If you haven't checked out Crimson Tate, it's time you gave her site a look - I did! She's pretty adorable!  And this is one of her quilt patterns.


I dug really deep into my fabric stash for this one, and when I came back up for air, I found some fabrics from 10 years ago...I'm not sure how that's even possible.  Time passes fast while we're busy quilting away!  :)

I wanted to use a variety of color what would play nicely together for this quilt. While you search your stash for this project, keep in mind the pattern calls for WOF cuts, but I was able to use some fat quarters on the end pieces. 

I randomly found this beautiful Victoria Findlay Wolfe fabric at a quilt store three weeks ago that I was able to pull into this quilt.  I loved it and didn't know what I was going to do with the fabric at the time, but I quickly sourced it!  It's really one of those great whites that you need to snag when you can find it and you'll figure out a use later.  I found Victoria on Instagram and I'm so pleased to support her!  Check her out if you haven't already.
And ask your local quilt store if they're caring her line, Meadow Storm.  You'll be happy you did!

This pattern is quite fun and fast.   I made the lap size so I made three strip sets of three, you get a choice of eight. These are really large blocks ,so it came together in a weekend for me. Have you're ol' trusted  24" ruler, cutting mat and rotary cutter in hand and you're in business!  This would be great for candy corn colors...or is that just me? I love candy corn! Tis the season! :)


You slice these up into triangles flipping the pattern back and forth over the strip sets and then sew three matching sets together to make your hexagon.  Be very careful to make sure your strips are the right size and all your tips are there.  Guess why I'm pointing this out...yup. :)  And you know me, I chain piece together whenever I can.  Be sure to be very careful to match up all your seams - you'll really notice if they're off.

 
So here's my stack to make my hexagons.  I find I sew much faster this way.  Try it, you might like it as well.  There's a lot less getting up and down, waisting thread, etc.  I just start with the block on top and go through the blocks one after the other.  Once I'm done I cut them apart and iron, iron, iron!

This is my lay out.  Do you like it?  It's a little different than the way the pattern has you lay it out, but I'm okay with that.  I think this made sense with the colors I'm using.  You chose what makes you happy.

I added my little rectangles on the ends.  Again I used bright different fabric fat quarters, the pattern shows more of a muted background color, another dealer's choice here.  You pick what you like.
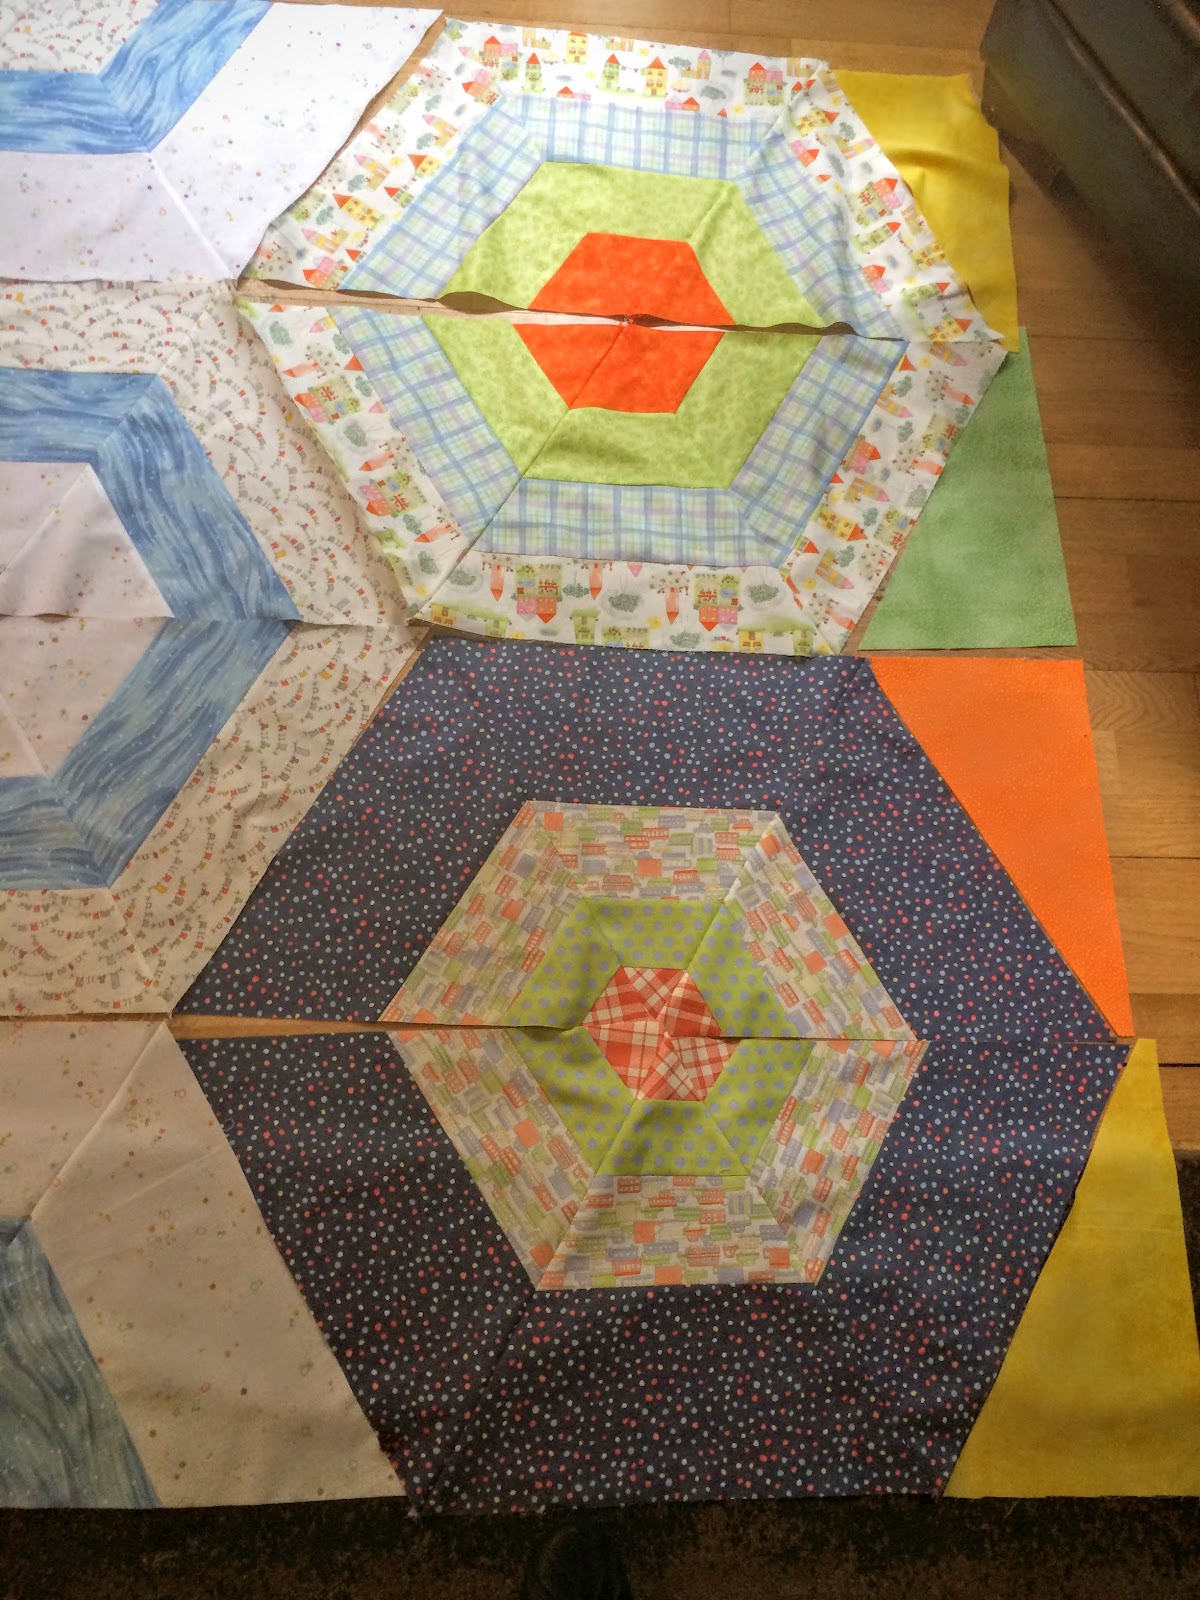

I had to sit and look at the layout for a while on this...like two cups of coffee "a while".  I couldn't figure out how I wanted to sew this together.  I decided to look online to see what info I could find.  Other then finding the cute Crimson Tate site, I really didn't find much out there.  So...this is what I did.  Let me know how you did it.

I worked from the right side left and I stacked the pieces one on top of the other so 1 is on top of 2, which is ontop of 3, ontop of 4.  I chain stitch through the pile, cut them apart, iron and move to the left.  It's like a dance...okay maybe I don't get out enough.

In this picture the first right seams are sewn together which means all the rectangles are now sewn to the half hexagons. Right now I'm only focusing on the seams running vertically.  After all the vertical seams are sewn up I'll sew the horizontal seams.

I'm sewing half hexagons together that are going in opposite directions, but it's the same process. Stack, sew, iron lay them back in place and move to the left.

For the last row, I opt to go far left and sew the rectangles in place first. Stack, sew, iron and back in place.  I then sew the right half with the left hand marring the two sides together.


Then I start the horizontal seams which is the easiest now because it's just 3 straight seams.
Fold the top down over row two.  


I opt to sew row three to four and then marry the top and bottom together and then viola, you're done!  You always have an option to add a border, but I don't think mine needs it.

I'll be pulling all the left over fabric to the back for some back art.  I love using up my scraps this way and I like the story to continue on the flip side.


My little Succulent Garden...

x

Child's Tote Bag


Sew, I'm at it again :) As I mentioned my nieces birthday is upon us.  I made her the Coral, Queen of the Sea doll but she also "needs" a camping bag like her Mom and Nana.  I made this bag about 10 years ago and loved it.  I used a canvas owl print fabric, and it was larger but basically the same.  This adorable fabric is made by Timeless Treasures and it's the perfect fabric for a camping tote bag.  The inside fabric is sleeping bags, using my stash.  I love using what I have on hand #usingmystashup! :)
In looking for a quick pattern I went to Pinterest, I ended up using The Reusable Market Bag posted by maricucu.blogspot.co.uk.
I cut the outside and inside fabric together at once so that all the edges would line up perfectly.


 I decided to use make the smaller option.  I didn't want the bag to swallow up my niece.  She's only 6...but in hindsight I wish I had made the larger one.  I think she would have been alright.  Really the small bag can hold a cartoon of eggs and one head of Romaine lettuce and you're done.  Luckily she'd never want to carry these items so we're good!  :)
 This bag starts off pretty straight forward, sewing around the handles, cut slits in seam around the curves for ease in the fabric so everything will lay nice and flat when you turn the bag right side out.  Always iron and set your seam.  Trim the seam allowances and clip corners to also help with the final look of the bag.  These steps will give the bag a more finished look, which I really like.
Now follow the pattern very closely for sewing the handles together, it gets a little tricky!  You stack the outside bag ontop of the inside bag, both right sides out.  You stick your hand up inside the first layer grabbing the other layers and flip them inside out.  Sew your seam and pull right sides out and magically the seams are all hidden inside, and the handles are made!


Doesn't that look nice?


 We sew a 1/4 around the neck of the bag, again this is all to make the bag nice and polished off.  These little steps really dial in your projects.


With the sides of the bag, you carefully sew them up without catching the handles.  I'm a pinner.  Are you a pinner?  And I never sew over my pins, I hear some do but I was always told that was a no no..and contrary to belief I am not a law breaker!  ;)


 We'll fold the handle in half towards the center of the bag and stitch in the ditch (sew in the seam).


Closing the bottom of the bag, fold the sides in at a natural fold line following the handle fold.  Sew the seam on the right side of fabric (I know, I too thought,whatttt) but it works! Then flip the inside out
sew another seam on the bottom of the bag. This is a French seam, it hides the seams on the outside and inside..sew smart and clean! 


Here's a peak at the inside bag.  See how all the seams are encased?  I love that!  I like to hide all of my seams. Nothing is better than when you give a gift and they question if it's handmade or not.  That makes it all worth it for me!


There are a ton of similar bags available on Pintrest.  Let me know your favorites!


One thank you from this lovely girl makes all the time you put into making a handmade gift completely worth it!  All my heart strings are strung all at once! :)

Coral, Queen of the Sea


Have y'all seen this panel by Moda?   It's quite adorable!  I thought this would be the perfect little gift for my niece who's turning 6. Her favorite colors are pink and purple.  And so were mine, and probably every other 6 year old girl.                                            

With one panel you get one doll, Coral, her stuffed animal Charlie, the sea horse (yes, I did just make up his name), a pillow, and of course bedding  - not to mention a cute mini skirt and a fishtail skirt.  A girl needs options, I totally get it!  
I brought this project to my office to work on during my lunch break, and the owner of the company stumbled upon my sewing room I've been hiding at the office.  He walked in, put his hands on his hips and finally said, "So this is the sewing room?"  :)


I started with the bedding, and used leftover batting I had on hand.  I needed to piece it, so I used The Original Quilt Basting Spray.  This stuff works wonders doesn't it? 
Leave a little opening when you're sewing to turn everything right side out.  I always leave the smallest possible opening - I don't favor hand sewing!  :/

To mark the opening, aka the "do not sew zone", I use two pins in the same location.  Whatever your technique is, just don't forget it or you'll be busting out our old friend the seam ripper.


I quilted little floating hearts randomly in the swirl of fish.


 The pillow comes next.  These are all super simple.  You are just cutting around on the dotted line, sewing using 1/4" seam, nothing tricky but super cute!


Next up: Coral!
To make sure you get these lined up perfectly, I thought I was being super smart and placed the cut-outs against the light, using it as my light box to ensure proper placement.

Smart, right?  Wrong!  I was leaning over my iron and didn't realize it until...


Yup!  I got myself good! I have never really burned myself in all these years.  I guess it was about time.  I now have a scar, and I don't think it's going to go away. I don't have any tattoo's so this is my new mark of passion!  :)  Silver lining, lets go with it.

Did you notice my little wrist pin cushion?  I love it.  I use it all the time!  There are new magnetic ones out there now a days but I like my old school one. 


Once I stopped burning myself, it was time to sew Coral together. She has the cutest little face.  Just like my niece! Her little arms and legs were tough to turn right side out, and because I was at the office, I didn't have all my normal tools. Sewing tweezers would have worked like a charm, but I was improvising, so I jabbed a pen in there.  It was a bit time consuming but two arms, two legs, and I was done.


Fish tail anyone?  Maybe I should call it a mermaid tail?  That sounds nicer.

I'm a huge fan of ironing.  I hope you are too.  It makes everything look so much nicer.  I iron all my seams to set them then if I'm opening up the seam I iron that too.


Ugh - more turning right side out.  Belts! Who knew Coral had so many belts! (now I know how my husband feels about my belts...just kidding, it's more my shoes...we need options!)  My fingers were exhausted by the time I was done!  I didn't have any safety pins that day either.  It was challenging! :)


I quickly wised up the following day and brought in a safety pin for pulling the drawstring belts through her two skirts.


On to the stuffing!  This is more challenging than it appears!  Her arms and legs are little and my fingers are not!  You really have to work the stuffing down to her pippy toes and finger tips!  Moda suggests toes first, then arms, head then body.  Once you stuff the legs stitch across where the body and legs meet for a bendy spot.  Same for the arms. 
Hand stitch all the openings and you are done!

Super cute!  :)

Bucket'ish List, Outdoor Quilt Show Temecula California


I had the adventurous idea to attend this years Outdoor Quilt Show in Temecula, California. Let me back track for one second.  On my official bucket list is the Outdoor Quilt Show in Sisters, Oregon.  The Sisters show has taken place the second Saturday of July for over 40 years! It's the largest Outdoor Quilt show in the world! But...I live in California and the Temecula show is much more feasible without much planing!  I woke up early with much anticipation, jumped in the car and in about 90 minutes I was there!  Oh what a site! 


Quilts were hung from the buildings of the Old Town district - it just felt so right!  If you've never been here before it's as if you've stepped into a time machine.  Some of the sidewalks are even old wood beams.  I do feel like they're missing an old town swinging door Saloon. What?  I can't be the only one thinking that?  Right? :O)


Families were out in full force looking at all of the quilts. I loved standing back and hearing everyone talk about all the different quilts they saw.  I was wearing my 'Quilter' Tee so people would just say random quilty things to me.  

Unlike a conventional quilt show where you know most people are going because they (we) are nuts about quilts, with a show like this, you get the run of the mill people who can just enjoy the rawness of a beautiful quilt.  Nobody's discussing the fabric line or the pattern that was used. Instead, I heard how they liked the chosen colors or 'wow look at the detail in this one!' 

If nothing else I hope people left the show feeling inspired.


The weather really cooperated. It was about 80 degrees with a nice wind so the quilts just danced in the breeze.


And they really were just strung from everywhere! My heart was singing!  


I really liked this picture: a vintage quilt next to a Starbucks.  A little old with a little new...and I'll take a Pumpkin Latte please! That will make Fall come faster!  It will!


I have this Sewing Quilt Kit on the left below.  It's called She Who Sews by Quilting Treasures. Actually, my Mom bought the same kit.  We have the same cute unmade quilt.  I must add that to the must make soon list.  Isn't it cute? Speaking of cute...The Farmers Wife Shop in Temecula is pretty spectacular. If you're in the area stop on in!  You can see it hiding in the back left of the photo below.


Lovin that wonky star quilt in the middle. 


Walking around the streets of Old Town with all these exquisite quilts really made me feel like Fall is finally upon us!  Finally! 


I hope you enjoyed the outdoor Quilt Show in Temecula, CA without leaving you're seat!  Spending the day walking around town taking pictures of all of these quilts just made my week.  I feel life is so short and I have a lot more quilts in me!  Ha!  Happy quilting!